Photo Slideshow Maker Platinum
- Software Features
- Flash Template Showcase
- Download Photo Slideshow Maker
- Flash Slideshow Solutions
- Free Web Album Service
- Flash Template Editor
- Create gift CD/DVD
- XML-driven Flash Gallery
- Support Services
- Frequently Asked Questions
- How to embed Flash to website
- Translate Photo Slideshow Maker
- Contact us
Flash Template Showcase
Building XML-driven dynamic flash gallery
The solutions suggested in this document only apply to the Advanced templates of Photo Slideshow Maker.
If you use Basic templates to create the flash slideshow, please refer to this help article: Inserting Flash (.swf) to HTML webpage
1. Creating XML-driven flash slideshow
When you proceed to choose theme template for the photo slideshow, click the Advanced tab. The advanced templates allow you to make dynamic flash slideshows.
2. Saving the photo flash slideshow
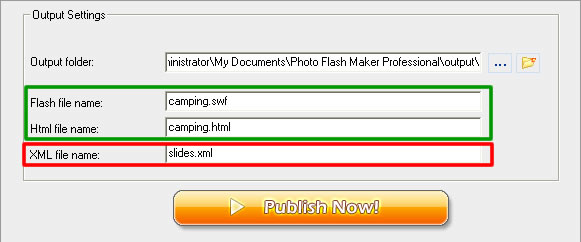
Before Photo Slideshow Maker publishes the flash slideshow project you create, you will be prompted to take care of the output settings as show bellow:

You can rename the SWF file and HTML document.
Don't rename the XML document, just keep it as "slides.xml". Changing it might cause the SWF file to "Load fail".
3. Managing the documents and assets
In the output folder, you will see several files and folders. These are the data source and assets that keep the flash slideshow play properly when it's embedded into website. The slides folder has the images which have their respective thumbnails present in the thumbs folder. The details of these images are listed in the XML document.
It's suggested that you keep the HTML document with all these assets in the same file folder, and do not rename those three file folders (the "res", "slides", and "thumbs", respectively), or you might have to make loads of changes to the XML and HTML documents. Nonetheless, you can re-name the file folder that contains these documents and assets.

Often time, you will need to incorporate the PFM-created flash slideshows into an existing HTML document, you can replace the PFM-created HTML document with your own one, but you have to manually add the proper HTML code into the existing webpage.
4. Inserting flash slideshow into webpage
To incorporate the flash slideshows created with Advanced templates into an existing HTML document, you can manually adding the <OBJECT> and <EMBED> tags to the existing page.
1. Open the PFM-created HTML document in a text or HTML editor.
2. Copy the HTML code included in the <object> and <embed> tags (see example below) and paste it into the existing HTML document. This should contain the <OBJECT> and <EMBED> tags.
swflash.cab#version=7,0,19,0" width="100%" height="100%">
<param name="movie" value="camping.swf?xml_path=slides.xml" />
<param name="quality" value="high" />
<param name="allowFullScreen" value="true" />
<embed src="camping.swf?xml_path=slides.xml" quality="high" pluginspage="http://www.macromedia.com/go/getflashplayer" type="application/x-shockwave-flash" width="100%" height="100%" allowFullScreen="true"></embed>
</object>
3. Open the existing webpage page, and paste the <object> and <embed> tags into the desired location in the body of the document. This can also be pasted into a table cell or frame.
4. Edit the attributes of the tags for the movie.
5. Upload the HTML and SWF files, together with the XML file, "res" folder, "slides" folder and the "thumbs" folder to the same folder to the same folder on your Web server.
* What if HTML, XML and SWF are saved in different folders?
Pay attention to the file path if you put the SWF file and the HTML and XML documents in different file folders. You have to make proper changes to the HTML code, or the flash slideshow would "Load fail" after uploaded to Web server.
Following are two solutions for solving the "Load fail" problem.
--- If all documents and assets in the same folder
If you keep the HTML and XML documents, SWF file and all the other assets in the same file folder, then you don't need to change anything. Just copy and paste the code to target webpage as suggested above.
--- If HTML document in an upper folder, with all the other files in another folder
In most of the cases, web documents and assets are sorted and stored by type, so that the webmaster can manage the website easily.
After analyzing many cases and the feedback from PSM users, we decide that this is the most common situation, also the best and easiest solution.
In this case, you need to change the file paths of the SWF file and the XML document in the <object> and <embed> tags, so that the SWF file and XML document are correctly linked from the HTML document.
Let's say, the SWF file and XML document and all the other assets are saved in the same folder named "assets_camping", then we shall make changes to the tags as show below, the red-highlighted area reflect the folder name containing the assets.

<param name="quality" value="high" />
<embed src="assets_camping/camping.swf?xml_path=assets_camping/slides.xml"…>
This folder name could be "flash_assets/assets_camping", "assets/slideshow/camping," etc, you name it, depending on the directory you store the assets.

