Support & FAQs
How to embed Flash slideshow to Joomla! website
Joomla! is an open source free content management system (CMS) platform for publishing content on the Internet. The Joomla! System is written in the PHP programming language and uses MySQL to store information.
To incorporate the PFM-created flash slideshows created into an existing Joomla! article, you should manually adding the <OBJECT> and <EMBED> tags to the article you want to show the Flash slideshow.
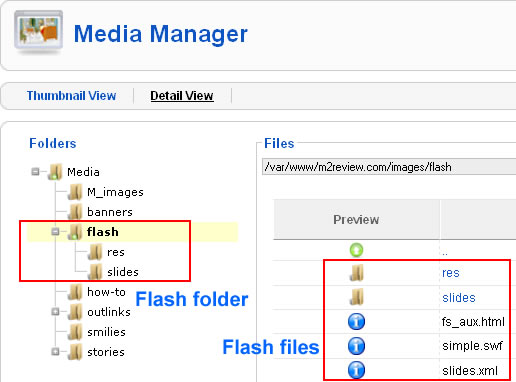
When you publish a Flash slideshow with Photo Slideshow Maker, the program will create several files and folders as follows:

Among them, the fs_aux.html provides HTML code for embedding the Flash movie (.swf file) into webpage.
Step 1. Upload Flash files to the media folder of your Joomla! System
You should create a folder under the media folder of your Joomla! System to store the Flash files, for example, a folder named “flash”. And then you can use the Media Manager or FTP client (such as FileZilla) to upload the “flash” folder.
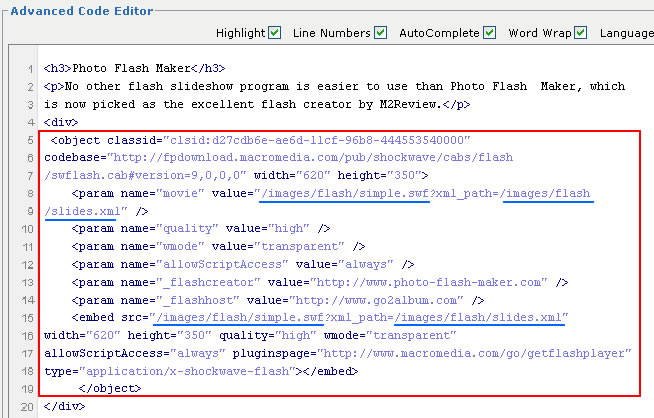
Step 2. Copy the embed code
Open the fs_aux.html document in a text or HTML editor, and copy the code included between the <object> and <embed> tags. This should contain the <OBJECT> and <EMBED> tags. For example:
<object classid="clsid:d27cdb6e-ae6d-11cf-96b8-444553540000" codebase="http://fpdownload.macromedia.com/pub/shockwave/cabs/flash/swflash.cab#version=9,0,0,0" width="620" height="350">
<param name="movie" value="simple.swf?xml_path=slides.xml" />
<param name="quality" value="high" />
<param name="wmode" value="transparent" />
<param name="allowScriptAccess" value="always" />
<param name="_flashcreator" value="https://www.photo-flash-maker.com" />
<param name="_flashhost" value="http://www.go2album.com" />
<embed src="simple.swf?xml_path=slides.xml" width="620" height="350" quality="high" wmode="transparent" allowScriptAccess="always" pluginspage="http://www.macromedia.com/go/getflashplayer" type="application/x-shockwave-flash"></embed>
</object>
Step 3. Open the article in HTML editing mode in Joomla!
Now you should go to the article that you want to embed Flash slideshow. Open it under the “Edit HTML Source” mode.

Regardless of the editor you use, you should be able to switch between design view and code view. Change to HTML editing mode, and paste the copied embed code to where it’s supposed to display the Flash slideshow.
Pay attention to the file paths of the SWF file and XML document. You should modify them, relative to the root folder, so that the Flash movie can correctly load and display.
Step 4. Update HTML code and save changes
After all changes are made, click the Update button to add the embed code and save the changes.
![]()
Now go to the preview the article in browser, you should see the Flash slideshow. Here is an example article with Flash slideshow created with Photo Slideshow Maker.
Don’t want or don’t know how to upload Flash files to Joomla! system?
Let us host the Flash files for you. Just choose to publish and upload your Flash slideshow to Go2Album, a free web album service dedicated to Photo Slideshow Maker users, and then get the code to embed the Flash to your website.
Step 1: Sign up for Go2Album
Go to www.go2album.com and sign up for the free service.
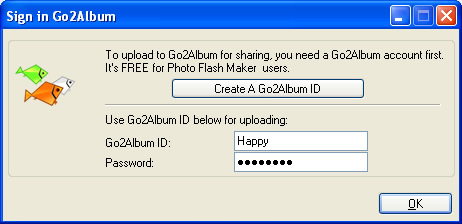
Step 2: Sign into Go2Album
Open the Photo Slideshow Maker program, click the menu "Preference", and click the "Sign in Go2Album" item, enter your user name and password, click "OK" to save the setting.
Step 3: Upload Flash slideshow to Go2Album
When you proceed to the last step of creating slideshow with Photo Slideshow Maker, select the "Create Flash File and Upload to Go2Album", and the Flash slideshow will automatically uploaded to Go2Album.
The program will prompt you to the webpage where the Flash slideshow displays.
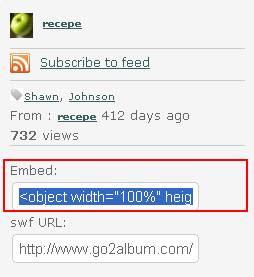
Step 4: Copy the HTML Code of the Flash Slideshow
On the right sidebar of the web album page, you will see the embed code. Select and copy the HTML code.
Step 5: Embed HTML code to designated webpage
Now you get the source code. Just open the webpage, and paste the code to where you want to display the Flash slideshow. Done.
![]() Download FREE trial of Photo Slideshow Maker to make flash slideshow
Download FREE trial of Photo Slideshow Maker to make flash slideshow
![]() Buy Photo Slideshow Maker to make flash slideshow without limitations
Buy Photo Slideshow Maker to make flash slideshow without limitations